http://sunshine--days.blogspot.co.uk/search/label/craftsHTML Map
Showing posts with label baking. Show all posts

Tuesday, 29 July 2014

So that you'd leave me alone in Leeds again


On Saturday, my buddy and I tried to have a little road trip to Ilkley lido to make the most of the rare outdoor swimming pool friendly weather we've been having. Alas, we got there to find out they'd stopped letting people in at 12.30 as it was so busy (it was 12.35 when we arrived...). Instead we went for a wander and an ice cream whilst we formed a back up plan to keep us entertained for the afternoon.

So we hopped back into Betty, my awesome new car, and drove to the fruit picking farm in Horsforth (with only a slight detour thanks to the satnav thinking that the farm was down a residential street in the middle of a housing estate...).  All that was left in the fields was raspberries as the strawberry season had just finished so we set off on our merry little way to the raspberry fields. The man at the stand told us that the raspberries were becoming harder to find but that there should still be plenty for us to fill our basket with. He was right, but we did have to keep disappearing into the depths of the bushes and branches to find anything worth picking- hard work when the weather was so crazily hot! We were very proud of ourselves when our dedication finally paid off and we wandered back to the man with a basket full of yummy looking berries. There's just something far more satisfying about picking your own fruit than pulling it off a shelf at the supermarket, and they definitely taste better too!


On Sunday, I realised I had a humongous box full of raspberries sat in my fridge as we'd not managed to make a real dent in them yesterday. Worried that they were going to quickly go past their best, I sarted plotting ways I could make something exciting and raspberry based.  I decided to experiment with ice lollies as it was far too warm to be slaving over a hot oven. With no recipe in front of me I tried to turn my lovingly picked fruit into tasty lollies. And actually, they seem to have worked pretty bloomin' well! And being the kind-hearted soul that I am, I'm going to share my secret recipe so that you have an excuse to go and pick your own fruit too!


Raspberry Lemonade Lollies

Ingredients:
250g raspberries
juice of one lemon
1-2 tsp honey
1tsp caster sugar
about 100ml lemonade

To make:
Weigh out your raspberries and mash them together until it forms a liquid. 

Seive the smushed up raspberries to separate the juice from the seeds (I then added some of the seeds to the bowl to make the lollies seem a bit more 'natural' without it being totally overrun with seeds but that's just personal preference).

Squeeze the lemon juice into the bowl of raspberry juice, add the sugar and honey and mix together well.

Pour the mixture into ice lolly moulds (I got mine super cheap in Primark!) so that they're about two-thirds full then top up each mould with lemonade.

Put in the freezer until frozen then sit out in the sunshine and enjoy :)
  

If anybody has any more summery ice lolly recipes then let me know- I'd love to try out more ideas!

Thursday, 19 June 2014

I'm a little too young with not enough time

During my laptop free life, I made possibly the easiest, tastiest treats ever known to man and it caused me a lot of sadness to know I couldn't instantly share the joy with all of you chocoholics out there. Fear not, because I've been saving up all of my excitement about these beauties for all this time ready to post about once I had a working laptop at my fingertips. 


I'm talking about Oreo chocolate truffles. Three ingredients, no baking, no fuss, what more could you ever need in life? 

To make these beautiful little things, all you need is:

two 154g packets of oreos (I used the ones with chocolate creme just to add a bit of extra chocolatey goodness)
1 tub of Chocolate philadelphia (they work just as well with just ordinary cream cheese but once again I decided a bit of extra chocolate wouldn't go amiss)
150g milk chocolate

To start, put the oreos in a plastic bag (or whizz them in a food processor if you're fancier than I am) and take out your frustrations on the biscuits with a rolling pin until the oreos are ground into fine crumbs. 
Pour the ground up oreos into a bowl with the cream cheese and mix together until it is all combined. 

Take a small amount of the mixture and roll into a ball. Repeat this until you have used up all of the mixture. 

Put the balls into the fridge for 30 minutes or so. 

Just before you remove the balls from the fridge, melt your chocolate in a heat proof bowl over a saucepan of water or in the microwave.

You've got a few options at this point. You could easily add lollipop sticks to the balls to turn them into cake pops as this will make the coating a bit more even all over or just leave them as I did and hope that the lucky recipients of these treats are too busy enjoying the taste to notice the imperfect presentation. 
Coat each ball in chocolate and then put back into the fridge for about 30 mins until the chocolate has set. 

Remove from the fridge about 10 minutes before serving, you could even go crazy and cover them in glitter like I did (yes, I was hoping the glitter would hide the parts where the chocolate coating had come off!)


See what I mean about them being easy to make? You'd be crazy not to give them a go! 


Wednesday, 5 February 2014

If anybody wants to know, our love is getting low

 Last week, everyone at work was (semi) jokingly talking about how I haven't provided them with cake in a while, I fully blame this on the massive quantity of Christmas chocolate we still had in every corner of the office throughout January... working in education is possibly the most chocolate filled career ever. Teachers always have tonnes of the stuff! Towards the end of last week, we miraculously polished off the last of our supplies, so I agreed that we probably needed something to get us through so we weren't all experiencing withdrawal symptoms from a lack of Roses in our lives.

And so, not wanting to do things by halves, I went for possibly the most gooey, unhealthy option ever. Salted Caramel Brownies. They're quickly becoming my favourite thing in the world to make and they went down an absolute treat with everyone at work (which I'm not sure is the highest accolade really as we'll literally eat ANYTHING if its left on the table for more than five minutes!). The recipe is based on this one from The Boy Who Bakes and its surprisingly easy to do!

Salted Caramel Brownies

Ingredients:
180g plain flour
3tbsp cocoa powder
1/4tsp salt
300g dark chocolate
150g butter
150g caster sugar
220g soft brown sugar
4 eggs
1tsp vanilla extract

for the filling:
1 tin of Caramel
1 or 2 tsp salt

Preheat the oven to 160C (fan) and grease your baking tin (I'd probably suggest using some baking paper to line it with but I didn't have any in the cupboard... the brownies still came out ok though!). 

Place the chocolate and butter into a heatproof bowl over a pan of water and stir on a medium heat until all has melted.

Add the eggs, sugar and vanilla extract to a bowl, add the chocolate and mix together until smooth. Sieve in the flour and cocoa powder and beat the mixture until it is all combined. 

Pour half of the mixture into the tin, making sure it is evenly spread across the whole tin. 

Take the tin of caramel and add the salt to the tin, mixing thoroughly. 

Add a layer of caramel on top of the brownie mixture in the tin- make sure you don't get the caramel too near to the edge of the brownie- leave a gap of about 1-2 cm. 

Layer the remaining brownie mixture on top of the caramel, making sure none of the caramel is visible afterwards.


Bake the brownies in the oven for about 30 mins and then leave to cool before serving (unless you're as lazy/greedy as I am... in which case tuck in- they taste pretty damn good warm!).


Let me know if you try these!

Monday, 23 December 2013

He's put a great big smile on somebody's face


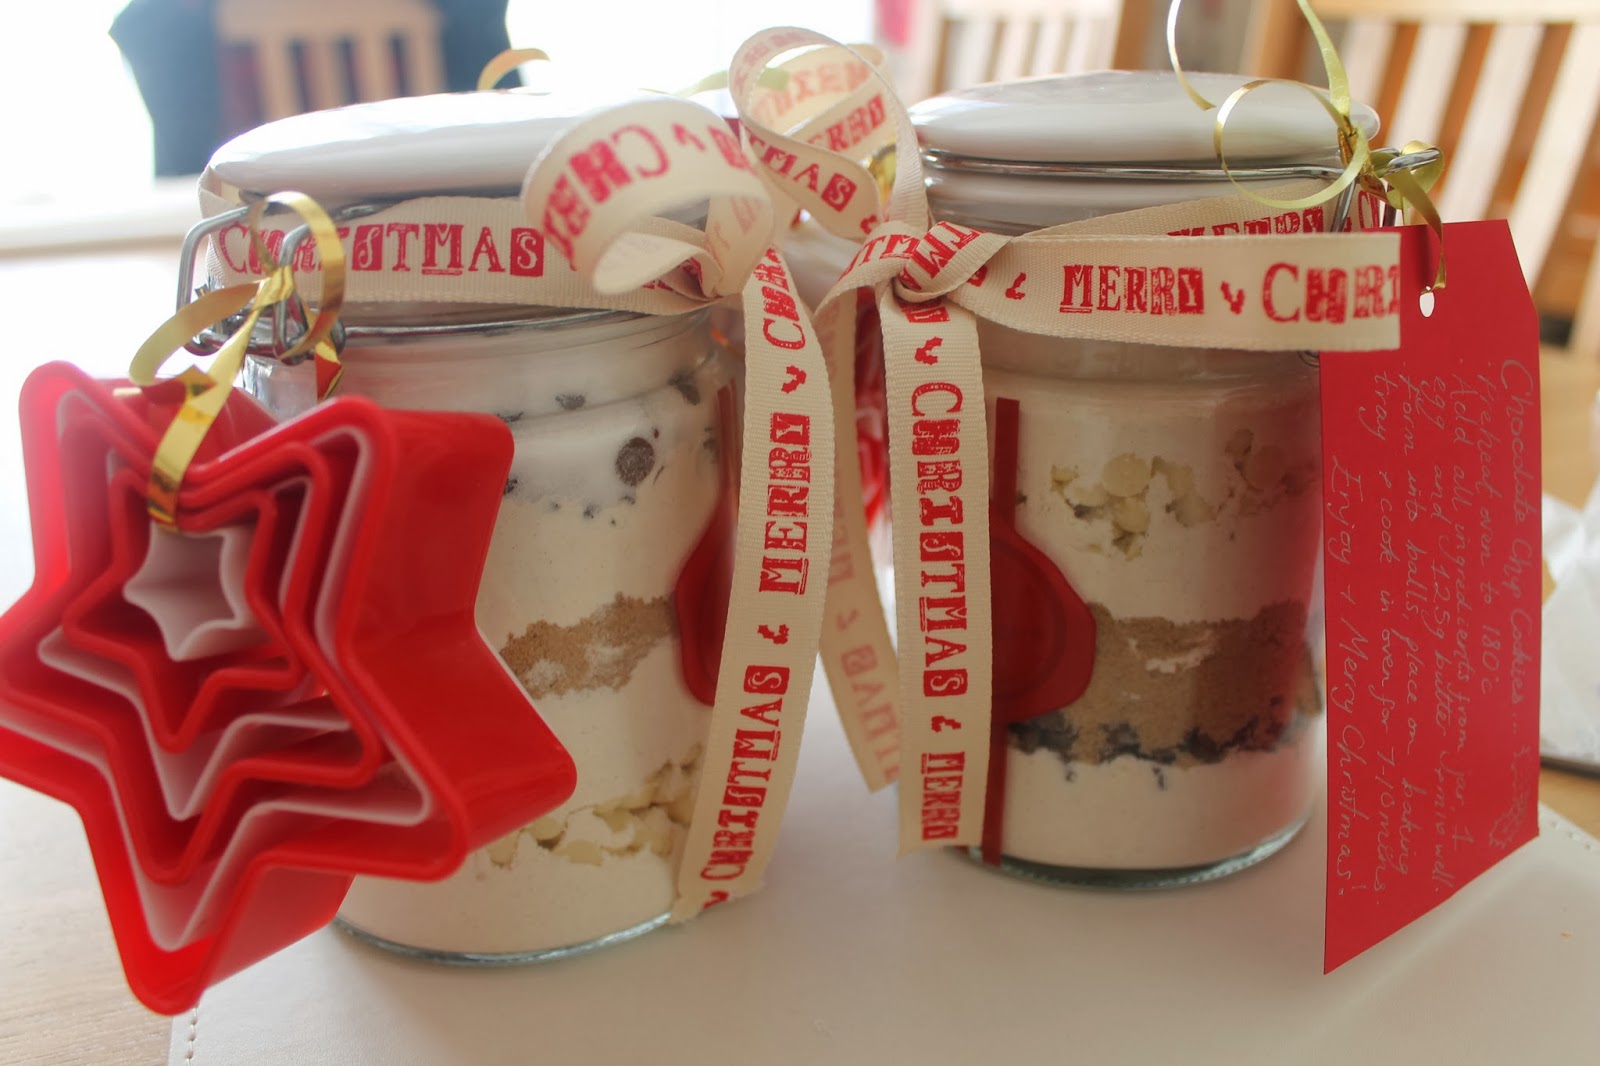
 Hopefully by now your Christmas shopping is all done and dusted, wrapped and sitting smugly under your Christmas tree. But if you're a bit stuck, or just looking for something else to make a present that little bit extra special then I might just be able to help you. These little cookie mix jars are really easy to make (if I can do it, anyone can!) and you should be able to find everything you need in the supermarket without too much difficulty. I gave these little beauties to two of my friends yesterday when we met up for our annual Christmas food and film day and they were the perfect present for our £5 price limit (it seems to be a recurring price limit for me this year!). 


The actual cookie mixture inside the jars didn't go in as neatly as it could have done, but I figured it was ok as it just proves I made them myself! Cleverly, I read some tips on making recipe jars after filling my own up and they suggested starting with the finest ingredients at the bottom of the jar and then putting any chocolate chips or similarly 'gappy' items at the top- as you can see, the sugar escaped through the gaps in between my chocolate chips, making the layers a bit messier and less defined. But the jars (which I found in Clas Ohlsen- definitely an extra bonus finding Christmassy jars when I was just on a hunt for plain ones!) and the ribbon hopefully made up for the way things were looking inside the jars!

I got the cookie cutters from Home Bargains, I found two separate packs, one white and one red, and decided to mix the colours up to jazz things up a little bit. 


If you fancy making one of these yourself, the recipe inside the jar was as follows:

125g caster sugar
100g soft light brown sugar
225g self raising flour
100g white chocolate chips
100g milk chocolate chips

For the label, you need to write instructions along the lines of:

Preheat oven to 180C
Add all ingredients from the jar, 1 egg and 125g butter to a bowl and mix well until all is combined
Form the mixture into small, slightly flattened balls and place on a baking tray
Bake in the oven for 7-10 minutes

Let me know if you give these a try! They're a great present all year round and you can fill them up with all sorts of different ingredients (my friend made me a brownie jar for my birthday earlier this year).


Thursday, 12 December 2013

Throw your arms around the world at Christmas time

In the spirit of all things festive, I decided to get myself in the Christmas spirit by indulging in a spot of baking for this month's 'winter wonderland' themed Iron Cupcake competition. Usually I don't bake for the competition as I help out a lot with the running of the evening but this time I decided to challenge myself and take a break from helping. I spent ages trying to come up with a fun idea that wouldn't be too difficult (I'm not the most confident of bakers when it comes to all things technical!) and it all paid off as I ended up winning the prize for the cake that best fit the theme! I'm a bit too proud of myself now!


If you fancy having a go at making my reindeer cupcakes yourself then you're in luck- I'm going to share the recipe with you lovely people. 

Reindeer cupcakes
(Makes about 15)

For the sponge:

140g unsalted butter
200g light brown sugar
60g treacle
60g golden syrup
3 large eggs
300g self raising flour
1tsp ground ginger
1tsp ground nutmeg
1tsp salt
240ml milk (warmed)

For the salted caramel buttercream:

400g icing sugar
200g butter
1/2 tbsp golden syrup
1/2 tbsp treacle

Preheat oven to 190C and line baking trays with about 15 paper cases

Beat the butter and sugar together until light and creamy. Add the treacle, syrup and eggs and mix again until the mixture is all combined.

Sift the flour, spices and salt and then add half of this to the bowl with the other ingredients, mixing well. Then add half of the warm milk and mix again. Repeat until all of the flour and milk has been incorporated into the mixture.

Add the mixture into baking cases and bake for about 20-25 minutes. When cooked, remove the cakes from the oven and leave to cool on a wire rack.

To make the buttercream, sift the icing sugar into a mixing bowl, add the butter, syrup, treacle and salt and mix well. (You may want to taste a little at this point and check it has the right amount of salt in for you- I added a little more to make sure the flavour really came through!)

Pipe the icing and decorate the cakes with pretzels, smarties and icing to turn them into reindeer!

Enjoy!

They're really not too difficult to make at all (believe me, if I can do it anybody can!) and they taste lovely and Christmassy. Let me know if you give them a try yourself!

Everyone at work judged me for saying I prefer this version to the original... but I just love the fact that I recognise everybody in the video (hello Busted!) and it reminds me of being 14 again)

Saturday, 28 September 2013

I'm so cold, let me in at your window

My bestests and I have a bit of a long standing thing about Harry Potter. I think it all began around my 21st birthday when two of my friends were running around Liverpool on a night out acting like dementors (don't ask me how or why, but if you knew me and my friends you'd understand that explanations for matters like this are entirely unnecessary- we're as mad as a box of chocolate frogs). To celebrate one of the dementor's birthdays last weekend, Charlie and I made some Harry Potter inspired cupcakes for us all. Just to clarify, when I say Charlie and I, I mostly mean Charlie... she runs IronCupcake:Leeds so really I thought I'd best leave things up to the expert! That said, I did manage to lend a hand with a lot of the decorations so thought it'd be rude not to share our handiwork with you all since they turned out so well.


The cupcakes were 'butterbeer' flavour (that's butterscotch to all of you muggles out there!) and since my housemate enlisted Charlie to assist with making the same flavour cakes again a few days ago for a hen do I can share the secret recipe with you all! 

Butterbeer flavour Harry Potter Cupcakes

Ingredients

For the sponge:
6oz butter
6oz soft brown sugar
3 eggs
6oz flour

For the buttercream:
200g butter
400g icing sugar
1tbsp golden syrup

White ready-roll icing plus other colours for the decorations

First, preheat your oven to 180C.

Cream together the butter and brown sugar until light and fluffy.

Add the eggs and mix well.

Gradually sift in the flour and mix together until everything is fully combined.

Add the mixture to cupcake cases (you should get somewhere between 12-15 cakes out of the mixture depending on how big your cases are!) and bake in the oven for 15-20 minutes until springy to touch.

For the icing

Add the butter and icing sugar to a bowl and mix well. 

Add the golden syrup and mix together until the mixture is smooth and creamy.

Pipe onto the cakes once the cakes have fully cooled.

Cut circles of white icing to fit the top of each cake. Decorate with the Pottiest of decorations and then add the circles to the tops of your cakes.

Applaud yourself for making something so yummy that would satisfy even Dumbledore's sweet tooth.

(this song became a bit of a highlight on Saturday night... we spent a lot of time flailing our arms about to this song)

Monday, 24 June 2013

Smiles of the week: Take me dancing in the wild

This week started off on a fairly unpleasant note. I shuffled sleepily into the bathroom this morning and in an attempt to grab all of my toiletries off the shelf in one go for my shower I just about managed to open my eyes enough to watch my razor tumble into the toilet. Cue a good five minutes spent trying to play hook a duck with the toilet brush whilst my razor taunted me from the bottom of the toilet bowl. Sometimes my life is too glamorous for words. This is why posts like this are necessary on a Monday (although the start of this post would make a pretty good attempt at a Mundane Midweek post a la Charlotte's Web), I love reminding myself of the little moments that have happened over the last seven days to make me remember that life isn't all as traumatic as this morning was. Hope you enjoy reading this week's little list of highlights from the last couple of days.


There's been a lot of chocolate cake involved in the last seven days. Firstly, Charlie's birthday cake, closely followed by cakes I made for work (we had a pack of eggs left over from our baking sessions at work so I was cajoled into using them up and feeding the office in the process). Then it was all topped off with a cake from Zuger's- literally the best chocolate cupcakes EVER. If you're ever on The Wirral or in Chester then visit one of their cafes or you'll regret it forever. 

Making said birthday cake and laughing LOADS at our ridiculous attempts to create a twin for the easiest pig character we'd spent about 10 seconds putting together. It suddenly became impossible to make another so after about 50 attempts we went for what was technically a far more complicated option and got it right first time.

Meeting up with two of my old best friends from school and hearing about all of the exciting grown up things that are happening in their lives. Meanwhile, I chose that day to strongly resemble that picture you can see of my five year old self with a pinafore and my big plastic Ray Bans. I may not be getting a mortgage and may look like an overgrown reception child but I'm very, very happy with my little lot. I'll happily watch my friends grow up around me but for now I'm perfectly content to stay just the way I am.

Finally reaching a point where I no longer felt absolutely stuffed from my meal out on Tuesday (three days later...) and enjoying a good gossip over a bowl of nachos and a bottle or two of wine with another of my besties from school. 

Playing scrabble with my Mum and Dad. I even helped my Dad by pointing out how he could make his three letter word add up to 42 points just by moving it one space to the left (and as a result lost the game...). 

Going to a charity Afternoon Tea party at my Mum's friend's house. Despite it being so windy we felt like we were battling a tornado to reach the scones it was really lovely to be sat out in the garden surrounded by people drinking tea (well, I had a lemonade) from vintage china under a canopy of pretty bunting. 


I'd love to hear what's happened in your world over the last week, here's to this one being a good 'un :)


Wednesday, 19 June 2013

Hold your horses now, sleep until the sun goes down

Yesterday was my best buddy's birthday. We celebrated with an absolute mammoth feast at Cielo Blanco in Leeds Trinity, and when I say feast I mean morefoodthanI'veeverseeninmylifebefore. Wow. Not only was there absolutely tonnes of food, but it was all incredibly tasty too- I'm a big fan of Mexican (and cocktails...) and definitely was not disappointed! If you're ever in Leeds, definitely pay them a visit and get one of the sharing boards if you're feeling hungry- the pork belly was a definite highlight! It wasn't the cheapest place I've ever been but it was great for a celebration, if you want something a bit more budget then I've road tested Neon Cactus (their more relaxed sister restaurant on Call Lane) which is a bit more budget friendly. 


Anyway, now I've made myself want to eat that all over again, the meal was followed by a cake made by yours truly. I felt as though I was under quite a lot of pressure making a cake for someone who's such an expert baker, but knew I was off to a good start when her boyfriend and I both simultaneously decided that the perfect cake for Charlie should be pig themed. Clearly we both know her too well. I'm not particularly good with icing cakes so when I found this cake after googling 'pig cakes' I managed to come up with the perfect solution to my far from perfect presentation skills.


The chocolate cake is my Granny's old tried and tested recipe. I spent many happy days with her in the kitchen as a child making lovely chocolate cakes with her. Its the only chocolate cake I ever make- nothing else compares to the taste of this and the memories I have attached to the taste.

And guess what, lucky people... I'm going to share Granny Betty's recipe for you all to try. (Piggy decorations optional...)


You will need:
For the cake:
8oz butter
8oz caster sugar
4 eggs
12oz self raising flour
2oz cocoa powder
2tbsp milk
2 tbsp golden syrup

For the icing 
(this isn't part of my Gran's recipe, she used to just melt chocolate but I decided I wanted something a little more 'mud-like'... also explains why this part is in grams... I didn't want to risk messing the quantities up by converting it!)
150g icing sugar
150g butter
125g melted dark chocolate

Preheat oven to 190C.

Cream together the butter, sugar and golden syrup in a bowl until light and fluffy. 

Once combined, add each egg one at a time, mixing after adding each egg.

Sift the flour and cocoa powder into the mixture gradually, stirring as you go. 

Then add the milk and mix together until you have a smooth consistency. I ran out of milk, having just guessed and bought a little home from work (not being a tea drinker or cereal eater I never buy milk so thought I might aswell just grab a little from the work canteen to save wasting a whole bottle!). 

Pour the mixture into a lightly greased cake tin and bake for 40-45 minutes until a skewer comes out clean.

Once the cake has cooled a little, remove from the cake tin and leave to fully cool. 

Meanwhile, melt the chocolate for your icing. Begin to cream together the butter and icing sugar and then add the melted chocolate and mix until it is all combined.

Cover your cake with the buttercream icing and then if you're making a nice little mud bath then grab some pink icing and roll into little pig shapes (this was by far the most fun bit, and they were surprisingly easy to make thanks to the help of my lovely assistant Coral) and cover the edges of the cake with crumbled up flakes.

Enjoy! 

Let me know if you try this- I'd love to hear if you like my Granny's old faithful recipe as much as I do. 


Sunday, 19 May 2013

She takes my time and I don't mind

You may have seen me mention earlier in the week that I'd had a stroke of madness and decided to enter a cupcake competition. I've been a regular at the Iron Cupcake competition since it started a few years ago but have always seen my role as one of the judges more than as a baker. I'm definitely quite talented at eating cake, not many people can munch through a selection of entries as quickly  skilfully as I can. And yet, despite knowing where my real talents lie, I somehow convinced myself that this was going to be the month I'd bake lots of cupcakes fit to be scrutinised by a hoard hungry people with score cards. 

I didn't win the competition, there were far too many amazing entries as always (sneak a peek at the rest of the entries here), but I'm more proud of myself for actually challenging myself to bake for an audience other than my office at work (who quite frankly will eat anything I put in front of them!). Plus being a baker meant I saved myself from the usual Sunday evening sugar induced coma I tend to experience after the competition. I'd like to say I'd turned over a new leaf and was becoming a healthy little bean, but then I'd be lying about what happened to the leftover back-up cakes I'd made in case my first set went wrong...

So, my efforts for the competition were Cookie Dough cupcakes. I'm one of those people that enjoys eating raw mixture just as much as I love the end product, so if you're anything like me this cake is the absolute best of both worlds as a hefty chunk of uncooked cookie dough is hiding inside each cupcake. The basic recipe was from Making Cupcakes with Lola and, not that I'm one to blow my own trumpet or anything, they tasted bloomin' amazing!

Cookie dough cupcakes
makes 12 (although I doubled the recipe and it made 28... the mixture goes a long way!)

for the cookie dough and cookies for decoration:
4 tablespoons butter
100g light brown sugar
150g plain flour
6 tablespoons condensed milk
1/2 teaspoon vanilla extract
6 tablespoons of chocolate chunks/chips

for the cake mixture
200g plain flour
1/2 teaspoon baking powder
1/2 teaspoon bicarbonate of soda
1/4 teaspoon salt
180g butter
175g light brown sugar
1tsp vanilla extract
2 eggs
3 tbsp milk
60g of chocolate chunks/chips (I used chopped up bars of milk chocolate because I'm not a big fan of chocolate chips, plus I decided the chunks looked more authentic!)

for the cookie flavoured icing
175g butter
150g light brown sugar
150g icing sugar
50g plain flour
3 tbsp milk
2 tsp vanilla extract


(You're best off starting with the cookie dough as this needs to sit in the fridge for an hour after making)

Combine the butter and sugar until light and fluffy, then add the flour, condensed milk and vanilla extract and beat until the mixture is smooth and combined. 

Once you've done this, add the chocolate chips/chunks and mix them into the dough.

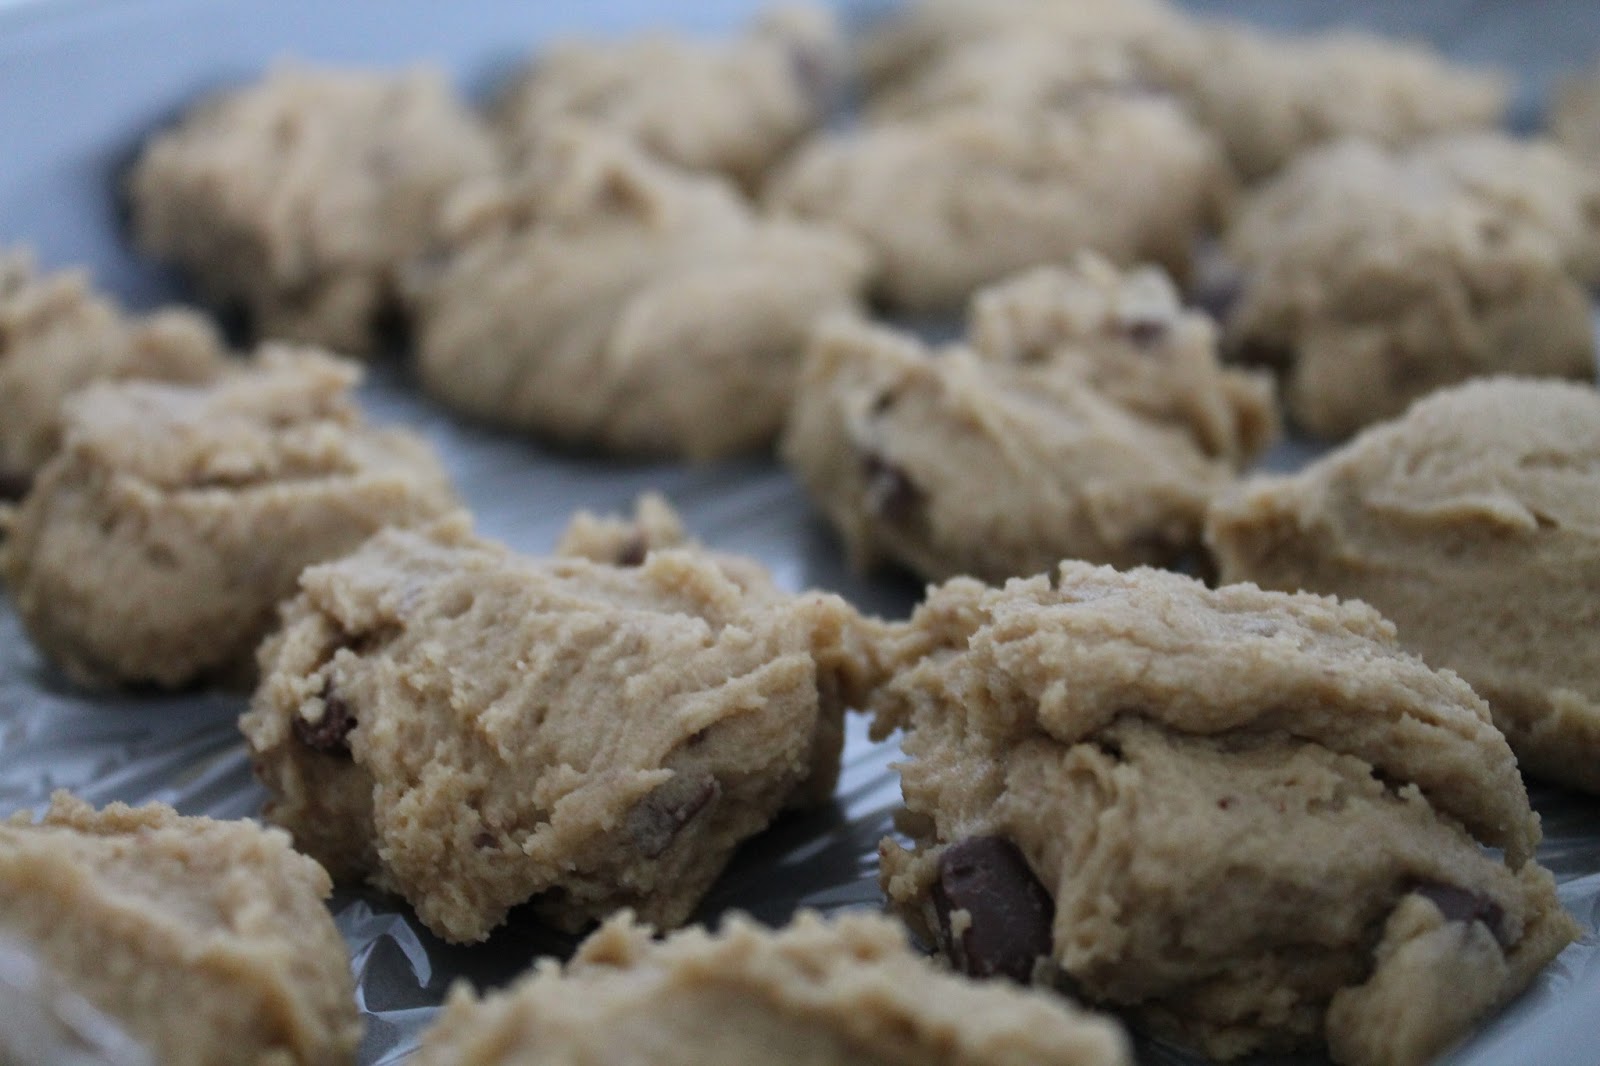
Form into 12 balls (pictured below) and 12 small, flat cookie shapes for the cookie toppings. 

Bake the small cookies in the oven at 180C for about 5 minutes/ until they're just starting to go brown around the edges. 

Place the balls of cookie dough in the fridge for an hour or so whilst you make the cakes.

For the cupcakes, preheat the oven to 180C. 
Cream the butter, sugar and vanilla extract. Once you've got a fluffy mixture, add the eggs and beat well. 
Sift about a third of the flour, baking powder, bicarbonate of soda and salt and mix well. Add about 1/3 of the milk and mix well. Repeat this until all of the milk and dry ingredients have been added and mixed together. 

Once this is done, add in the chocolate chips.

Divide the mixture between your cake cases and bake in the oven for about 20 minutes, until springy to touch.

When your cupcakes have had time to fully cool, using a sharp knife, cut a hole in the middle and fill each cupcake with a ball of the cookie dough mixture.

Whilst you're waiting patiently for your cupcakes to cool, make the cookie flavoured icing. 

Cream butter and brown sugar together then add in the icing sugar until it has formed a smooth mixture. 

Beat in the flour and salt, then add the milk and vanilla extract and mix until smooth.

Spoon the icing into a piping bag and pipe onto the cupcakes.

Top each of your cakes with one of the cookies you made earlier. 


Apparently its World Baking Day today, so if you're feeling like rising to the occasion, these would be a perfect way to spend your Sunday! 


Friday, 29 March 2013

You could be my ice age sugar

After jumping on the creme egg brownie bandwagon earlier this week, I decided that it was entirely necessary for me to test out creme egg cupcakes too in preparation for Easter. I'd already planned to bake some treats to bring into work for our last staff meeting before the holidays, but after having a chat with one of my colleagues realised that she was planning on bringing cakes in too. I still wanted to make something but being the extremely ever so slightly competitive person that I am, I needed to do something that little bit extra special because I know she has a reputation as the best baker in the office after we'd had a jokey chat about how we should turn it into a bake off. So, after letting her enjoy her glory on Wednesday with her cakes (which were pretty yummy, I'll give her that), I turned up to work the following day with my offerings. I'd been a little concerned about whether my plan would backfire on me as a few people had casually mentioned that they didn't like creme eggs the day before, but even they wolfed them down and got very over-excited by the secret creme egg in the middle of the buns (see, EVERYBODY likes creme eggs really) I think my mission to be crowned champion Easter baker in our unofficial bake off was a resounding success. So, if you want to impress people this Easter, you know what you need to do.

Creme Egg Cupcakes

100g butter
100g caster sugar
2 medium eggs
100g self raising flour
25g cocoa powder
12 mini creme eggs (plus more to decorate the cakes with)

100g icing sugar
100g butter
75g melted chocolate

*freeze the 12 creme eggs the night before you make your cakes)*

Preheat your oven to 180C 

In a bowl, cream the butter and sugar together. Once combined, gradually add the eggs to the mixture, stirring as you go. 

Sift  the flour and the cocoa powder into the mixture and beat until smooth.

Line a 12 hole cake tin with cake cases, drop a teaspoon of mixture into each case initially and then rest the mini creme eggs on top of this before covering with the rest of the mixture (this should help to stop the creme eggs sinking right to the bottom of the cakes when they bake!)


Pop your cakes into the oven for about 15 minutes, then when they're ready remove from the oven to cool. 

Meanwhile, cream together your the butter, melted chocolate and icing sugar until you have a smooth icing. 

Once the cakes have cooled, pipe or spread the buttercream on top of the cakes (I decided I was too lazy to pipe mine, plus the flatter surface helped my mini creme eggs to sit nicely on top of the cakes and not slide off!). 

Get a sharp knife and halve your mini creme eggs down the existing line around the edge of the eggs and place on top of your cakes.


So there you have it, an easy way to impress your friends and family this Easter whilst making the most of the limited time that creme eggs grace our supermarket shelves. I'm planning on stocking up after Easter when everything gets reduced (malteaser bunnies for 10p each were my bargain of choice last year... here's hoping that happens again this year!) so I can carry on making these beauties for a little while after the Easter bunny has been and gone. 

Thursday, 14 February 2013

Iron Cupcake: Be My Valentine

Some of you might remember my last post about the monthly Iron Cupcake competition that takes place in Leeds. For those of you that don't know, its a monthly competition for bakers who are given the challenge of creating a set of cupcakes based around a given theme. Then fatties cake enthusiasts like me get to sample the selection and give marks to each cake based on their taste and appearance (not an easy task when there's such a talented bunch of bakers but someone's got to do it!). 

This month's theme was "Be My Valentine", and I was expecting table after table filled with pink, flowers and hearts and not a lot else. And, ok there were a lot of hearts. But they were all so beautifully presented that I didn't mind. Plus there were some slightly less traditional ideas floating around too, particularly the 'last rolo' cupcakes which I thought were a fab little idea (as far as I'm concerned, sharing your last rolo is what romance is all about!). There was another great take on this cheesy holiday from Charlie who made a savoury cupcake that was made of cheese upon cheese with a puff pastry cheese heart on top (the Valentine's cynic in me gave her the inspiration for that little number when moaning about the holiday!). 

This is just a little snippet of the cupcakes the bakers brought along, the full line up will be on the Iron Cupcake website if you fancy a gander. 

If you're in Leeds on the 10th March and enjoy cake as much as I do, then come along and judge- its a great excuse to allow yourself to eat a tonne of cake and not feel in the slightest bit guilty about it... after all you need to sample them all to be able to crown a winner, its only fair!


Saturday, 2 February 2013

Hey Kemosabe, I'm alone.

This week has been l-o-o-o-o-o-o-o-o-o-ng. We had a special event for patients and their families today that I was running a lot of, so if I haven't been swimming in thousands of mind-maps and plans for the workshops I've been whizzing around the hospital at 90mph trying to get all my normal work done too. Its been one of those weeks where I haven't truly been able to unwind or switch my mind off, with a constant to do list whirling around in my head. 

And so, by Thursday evening, cake became necessary. 

Lemon drizzle cake to be precise. 

If you've had a crazynonstopgogogoaaaaaaahhhhhhhh week too, this is the perfect cure. And even if you haven't been suffering from headless chicken syndrome but just fancy some cakey goodness, there's no reason why you can't enjoy a cheeky bit of baking too.


You will need:
225g butter
225g caster sugar (+ 85g for the drizzle icing)
4 eggs
grated zest of 1 lemon
225g self raising flour
juice of 1 and a half lemons

Pre-heat oven to 180C (or 160C if you have a fan oven).
Cream together the butter and caster sugar in a bowl then gradually add the eggs to the mixture, stirring as you go. 
Sift in the flour and then add the grated lemon zest.
Stir until it is all combined into a smooth mixture.
Pour the mixture into a lined loaf tin and bake for about 50 minutes (or until you can insert a skewer into the middle of the cake and have it come out clean). 
Leave the cake to cool and then mix the caster sugar and lemon juice to make the drizzle icing. 
Pierce the cake all over with a skewer before pouring the drizzle over the cake (I made a huge messy puddle of the mixture on the worktop because I got a bit keen with pouring... go slowly here!). 
When the cake has fully cooled (I sneakily stood outside on the balcony at this point and let the freezing cold Leeds air speed up the cake cooling for me) remove from the tin and serve.

Easy peasy lemon squeezy. 


Bearing in mind my flatmate and I didn't finish making this until about 10pm on Thursday evening, there isn't even a crumb  left on the plate now. 

If that's not a winning recommendation then I don't know what is.


Sunday, 23 December 2012

Our cheeks are nice and rosy, and comfy and cosy are we


On Friday, after what felt like the longest week in all eternity, I finally got to skip out of work shouting "ITS CHRISTMAAAAAAAS" in a Noddy Holder fashion. After one traumatic walk to the station whilst carrying about a zillion bags filled with my clothes and Christmas presents, followed by two hours sat next to the moaniest girl I've ever had the displeasure of sharing a train table with, then a quick run around Liverpool with Papa Smurf to pick up some Christmas presents for my Mum, I was finally home for the holidays. 

I'd mentioned to my Mum before I got home that I wanted to make some mince pies to stuff my face with give out to a few people, and explained that last year I'd made the mincemeat from scratch so would like to do the same again. My Mum, being a very tidy and house proud sort of person cowers in fear whenever she hears that I want to set foot in the kitchen as I can be a bit of a whirlwind (I'm not sure she's ever quite forgotten the time when my friend and I were about 16, drank loads of rum and then decided to bake... the result was a big sloppy pile of cake mixture all over my Mum's floor. And walls. And cupboards.). so I arrived home to find a little jar of mincemeat waiting on the kitchen counter. Clearly she had visions of raisins dotting the ceiling and orange peel covering the floor and decided she didn't want to be subjected to that kind of mess. I was a bit gutted as I'd wanted to try this mincemeat recipe  that Rachael posted on her lovely blog, Made up of little things but they still turned out pretty well in the end. I'll just have to make sure I get round to making some in my own kitchen next year so I can do it properly! 

If you want to cheat like me and whip up some semi-homemade mince pies whilst making a mess of somebody else's kitchen then I used this mince pie recipe from the BBC food website. Its still not too late to get some ready before Santa comes down your chimney tomorrow night!